• Home
  • About
  • Comments RSS
  • http://www.callmecrazykunoff.blogspot.com
Blue Orange Green Pink Purple

Living the Crazy Life: One Recipe at a Time


Showing posts with label chocolate. Show all posts

Red Fish Cake

My brother got married back in March, but they had a small ceremony.  On Friday, they had a reception for all the friends and family that couldn't be at the wedding.  My brother requested a cake with a red fish jumping out of water.


The bottom tier is red velvet and the top tier is chocolate.  The fish is made of rice krispie treats covered in marshmallow fondant.


Read More 1 Comment | Posted by Kristin =) edit post

600 servings of cakes and 270 cupcakes later.....

Whoa...what a job!  In order to finish the cakes in time I started waking up at 5 am the week of the delivery date.  The temperature's been getting up to 100 degrees everyday.  The only way to beat the heat is to get up before the heat starts:)

Here are the final products.  Come back later for a step-by-step on the logo and the dragon!


Read More 0 comments | Posted by Kristin =) edit post

Kyle and Bree's Wedding Cakes

(You can click on any of the pictures to view an enlarged version.)


Friday I had the honor of making wedding cakes for my brother and sister-in-law to-be.  I didn't have the usual amount of time to put into decorating the cakes, so I opted for a buttercream icing look, instead of the usual fondant look.  


The bride's cake was italian creme cake (see recipe here) with buttercream icing and a strawberry filling.  Bree is definitely a bling kind of girl, so I added some blue crystals to match her blue hydrangeas, as well as some clear crystals.  I don't think they showed up very well but it was worth a try.


The groom's cake was of course chocolate.  I was especially excited about making this cake as it was a surprise to Kyle and Bree!  The frosting is a chocolate buttercream.  I also used a chocolate moose filling and a chocolate glaze with yummy chambord=)  Mmmmm.  The longhorn was made using a mold.  I tried a couple different ways to make the longhorn, one with white chocolate, the other with gumpaste.  I used the gumpaste longhorn because it held it's shape better.


I am still partial to the white cake, but the chocolate cake was pretty darn good too!  I tried a new technique on these cakes, and although they didn't turn out perfectly, I am still satisfied with what I was able to accomplish while student teaching this semester. 

We are officially 
sisters now! Congrats 
Kyle and Bree!


Read More 2 comments | Posted by Kristin =) edit post

Gotta Try This


I promise you, you will love this! Just thinking about it makes me want to make it again.

(And I'm watching Julie and Julia. I want to make all the things on the movie too...like poached eggs. I've never made poached eggs. But Amy has, and I'm hanging out with Amy. I think Amy and I will be poaching eggs tomorrow.)

This dessert is sooo simple. Like really simple. I promise. Simple.

People we eat it and be instantaneously transported to heaven. And they will think you spent alot of time preparing it. Or maybe not. At least they will love it=)

So here it is.


(Sorry the pics are a little off. I baked this at a hunting lodge which had beautiful lighting in the day but horrible lighting at night. Guess when I took the pictures?)

I need to name it but everything I think of sounds lame.

You'll need the following ingredients to carry this out:

1. brownies from a box
Now you can totally make brownies from scratch, but that's the beauty of it...You don't have to! No one will know! I, K. Kunoff, do hereby give you, ______________, permission to make brownies from the box.
2. large box of chocolate instant pudding
3. large container of cool whip
4. at least 2 cups of fruit
I usually use thawed frozen fruit, specifically berries. If you use strawberries, cut 'em up some.
5. some sugar, about 2 T

If you are using frozen fruit, take it out of the freezer to thaw, about 2 cups. Set aside. Bake the brownies according to the box. Let them cool. Next, make the pudding according to the box as well. {See, I told you this would be simple!} Let it set. Then take a cup or so of the cool whip and mix it in with the pudding. You don't have to be precise.


Next, sprinkle a couple tablespoons of sugar on the berries and mix it up.

Here comes the fun part.

Get out a pretty, clear/see-through serving bowl. Or go simple and use a glass mixing bowl...it will look good either way. Set your brownies, pudding, cool whip, and fruit in front of you.
Cut the brownies up and place enough in the bowl to cover the bottom.


(This is a picture of the second layer of brownies.)

Then cover the brownies with a layer of cool whip. Next, cover the cool whip with the pudding.


Then layer it with some fruit. Repeat.


Now, dig in! Share it or eat it yourself!

And help me come up with a name for it! Be creative.

And make this right now. Literally, you are missing out every minute you do not make this.

I'm gonna make something from the movie right now....at the moment they are eating a chocolate torte......Mmmmmmm.
Read More 2 comments | Posted by Kristin =) edit post

Marshmallows


The other day I came across a recipe for homemade marshmallows. (OurBestBites.com) Since I was in the midst of finals I took a much needed break to have some fun! This is definitely something you could do with kids...certain steps of it at least. They would have a blast.

These are super easy! Only catch: you'll need a candy thermometer.

Yummy Marshmallows
3 packets unflavored gelatin
1 C ice water, divided
1 1/2 C sugar
1 C light corn syrup
1/4 t kosher salt
1 1/2 t vanilla extract
1/4 C corn starch
1/4 C powdered sugar


First, add the gelatin packets to a stand mixer.

(Yes, you can use a hand mixer. However, this is about a 12-15 minute beating process. Be sure to have a super haus hand mixer and reinforcements for when you get tired of mixing.)

Then add 1/2 c ice water. Stir until mixed, then set aside.

In a medium saucepan 1/2 c ice water, corn syrup, salt, and sugar. Stir, and bring to a boil. Reduce heat to simmer. Clip candy thermometer to pan.

Leave mixture on low heat until it reaches 245 degrees, stirring occasionally. This will take about 15-20 minutes. You do not want to quickly raise the tempurature to 245. The process needs to be gradual. When it reaches 245, remove from heat.

Turn the mixer to low speed and
Slowly,
Slowly,
Slowly pour the sugar mixture into the gelatin.

If you get lazy and rush this process you will only have yourself to blame for the steaming burn developing on your hand.

Then turn the mixer up to med-high for 12-15 minutes. If you've got a stand mixer...read a book, watch tv, talk on the phone. If you've got a hand mixer, yell for back up. In the last couple minutes add the vanilla.

Prepare a 9x13 pan with nonstick spray. Then combine the powdered sugar and corn starch. Coat bottom and sides of pan with mixture. Save excess.

When marshmallow fluff is ready, pour it into the 9x13 pan. It's gonna be sticky so beware!


My best advice is to spray a spatula over and over with nonstick spray as you spread the marshmallow fluff throughout the pan. My next advice is to eat some of the marshmallow fluff. Mmmmm...it's soo good by itself. Better yet, try it with peanut butter and graham crackers.

Let it sit for an hour, then sprinkle the top of the fluff with a dash or two of cornstarch mixture. Continue to let the marshmallows firm overnight or 5-6 hours.

When they are ready, turn the pan over and pop the marshmallow out.


Then cut your marshmallows however you choose. For this round I stuck to squares.


However, you can totally go all out with cookie cutters! How cute would that be?!?! With the scraps, cut them into mini marshmallows=)

If you want to take your marshmallows to the next level I suggest a couple options:
1. Dip them in chocolate


2. Sprinkle toffee bits, peppermints, etc. on top of chocolate


3. Mix up the marshmallow flavors: add peppermint extract instead of vanilla, add cocoa powder for chocolate marshmallows (4 T), or try food coloring

Enjoy!
Read More 0 comments | Posted by Kristin =) edit post

Weight Watchers Chocolate Eclairs


Degree of Difficulty: Moderate. The difficulty comes from handling a pastry bag.

Taste: Not too shabby. The eclairs are a Weight Watchers recipe though, so of course there is room to improve with a more fattening version.

Time to Prepare: 2 hours total for a beginner. I have never used a pastry bag before; I think you may be able to assemble the eclairs faster if you have experience with pastry bags.

Weight Watcher's Points: 4 per eclair
*Click on photo to enlarge
Read More 0 comments | Posted by Kristin =) edit post

Cake and Kin

This past weekend I got to hang out with my immediate families. That's right, both immediate families.

Aaron's family.

My family.

Aaron's family got together to celebrate Mindy's birthday. (Mindy and I below shopping and playing with fun hats!)
My family got together to celebrate my mom's and brother's birthdays.

In honor of all the birthdays, what did I do? I baked of course! I made Black Forest Cake. I think it turned out pretty well.

Degree of Difficulty: Moderate to freakin' hard
Length: You need a good two days. The first day bake the cake and cool in refrigerator, soak cherries as well. The second day make the rest of the cake and assemble.
Taste: Cake is oh-so moist! Not too rich or overpowering.

(Click on the picture to see the recipe full screen.)
Read More 1 Comment | Posted by Kristin =) edit post
My Lamingtons
Read More 0 comments | Posted by Kristin =) edit post

Welcome to my blog!

Hello everyone! We shall see how this works...having a blog and all.

My desires in creating a blog are to share my life with you on a regular basis and to share my love for cooking and baking.


With that said, I share my first recipe (a rather long one):

Lamingtons-
Degree of Difficulty: Moderate to Somewhat Hard
Time: Frustratingly Longer than I would have liked
Taste: Pretty good! They remind me of Samoas, the Girl Scout Cookie

lamingtons.jpg
Cake Recipe:
2 cups (280 grams) all-purpose flour
2 teaspoons baking powder
1/4 teaspoon salt
1/2 cup unsalted butter, at room temperature
3/4cup granulated white sugar
2 large eggs
1teaspoon pure vanilla extract
1/2 cup (120 ml) milk

Chocolate Frosting:

4 cups (1 lb.) confectioners' (powdered or icing) sugar, sifted

1/3cup cocoa powder

3 tablespoons unsalted butter

1/2 cup (120 ml) milk

Coating:

2 cups unsweetened desiccated coconut, finely ground

Preheat oven to 350 degrees F (180 degrees C) and place oven rack to middle position. Butter, or spray with a nonstick cooking spray, the bottom and sides of an 8 inch (20 cm) square cake pan. Set aside.

In a large bowl sift or whisk together the flour, baking powder, and salt. Set aside.

In bowl of electric mixer, beat the butter until soft. Add the sugar and beat until light and fluffy (about 2-3 minutes). Add eggs, one at a time, beating well after each addition. Scrape down the sides of the bowl. Add the vanilla extract and beat until combined.

With the mixer on low speed, alternately add the flour mixture and milk, in three additions, beginning and ending with flour.

Spread the batter into the prepared pan and smooth the top with an offset spatula. Bake in a preheated oven for approximately 25-30 minutes, or until a toothpick inserted in the center of the cake comes out clean.

Cool the cake in its pan on a wire rack for 10 minutes. Place a wire rack on top of the cakepan and invert, lifting off the pan. Re-invert. Once the cake has completely cooled cut it into 16 two-inch (5 cm) squares. Wrap the cake in plastic wrap and refrigerate for several hours or even overnight. The reason for doing this is that it is much easier (less crumbs) to coat a cold cake with frosting.

Chocolate Frosting: Place the confectioners' sugar, cocoa powder, butter and milk in a heatproof bowl over a saucepan of simmering water. Stir the mixture until it becomes smooth and of pouring consistency.

To assemble Lamingtons: Make a production line; put the 16 squares of cakes on a wire rack that is placed over a
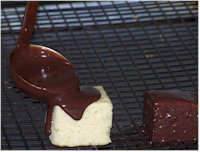
baking sheet (to catch the drips). Have ready the coconut on a large plate and the chocolate frosting. Spoon or ladle the chocolate frosting over each square of cake, making sure you cover all sides. (It is best to do a few squares at a time.) With a small offset spatula or knife transfer the chocolate covered cake to the plate of coconut and roll the cake in the coconut, covering all sides. Gently transfer the lamington to a clean wire rack to set. Repeat with the rest of the cake squares. Once the Lamingtons have set, store in an airtight container for several days.


I give all the credit to The Joy of Baking, a totally amazing baking website. However, I could never get my frosting thin enough. I had to settle for rather lumpy Lamingtons. I wish mine looked like the picture above! Oh well, onward and upward.


Read more:http://joyofbaking.com/Lamingtons.html


Read More 1 Comment | Posted by Kristin =) edit post
Home

Call Me Crazy

  • Recipe Finder


  • About Kristin
      Currently I am a student at UTSA studying Elementary Education. I am married to the man of my dreams, Aaron, and have a beautiful step daughter, Adrianna. I love photography, baking, cooking, reading, and watching college football. My dream: to own a bakery some day=) Contact me at kkunoff@yahoo.com!
  • Like Kristin on Facebook
  • Facebook Badge

    The Baking Chick

    Promote Your Page Too

    Pages

    • Home
    • About Me
    • Contact Me

    View my Tasty Kitchen Profile

    Recipes

    • 3D Cakes (2)
    • Italian cream cake (10)
    • bread (1)
    • brownies (1)
    • cakes (17)
    • cheesecake (1)
    • cherry (1)
    • chocolate (9)
    • coconut (3)
    • cookies (7)
    • cupcakes (2)
    • desserts (9)
    • easy (3)
    • gifting (2)
    • graduation (3)
    • granola (1)
    • health and wellness (5)
    • healthy (4)
    • lemon (1)
    • main course (2)
    • photos (2)
    • pies (2)
    • pork (1)
    • pumpkin (1)
    • red velvet cake (3)
    • restaurant review (1)
    • salmon (1)
    • shortbread (1)
    • simple (1)
    • special occasion (4)
    • sugar cookies (5)
    • sweet bread (1)
    • tea time (1)

    Followers


    • Home
    • Posts RSS
    • Comments RSS
    • Edit

    © Copyright Call Me Crazy. All rights reserved.
    Designed by FTL Wordpress Themes | Bloggerized by FalconHive.com | Blogger Templates
    brought to you by Smashing Magazine

    Back to Top